Google Storage 工具 GSUtil 使用入門

在申請到 Google Storage 的環境後,最先是直接使用瀏覽器來存放檔案。
不過,也看到網站說明,表示可以使用 GSUtil 工具。

對於 第一次 使用 GSUtil 工具者來說,除需要再下載 Phthon 程式;
還要將它們分別放置在各自的目錄位置,再依據 install GSUtil on Windows
進行 環境變數 設定及初始化指令的執行。

1. 環境變數 設定:

HOME C:\GSUtil
Path 補加 C:\GSUtil;C:\Python27
PYTHONPATH C:\GSUtil\boto

2. 初始化指令的執行
    python gsutil ls
** 要在 C:\GSUtil 目錄,下此指令
** 或是 python c:\GSUtil\gsutil ls
** 第一次執行,要輸入 google access key、google secret access key
(可以在 Google Storage for Developers (Labs) Developer Resources / Manage Keys 申請)


指令正確執行的畫面,如下
-------------------------------------------------------------------
C:\Documents and Settings\perton>cd \gsutil

C:\GSUtil>python gsutil ls
You have no boto config file. This script will create one at
C:\GSUtil\.boto
containing your credentials, based on your responses to the following questions.

What is your google access key ID? GOOG2XNKSJFIB5GOUXUH
What is your google secret access key? 3+DDysWmC97kUQuOwpZDVcGBtTywkXXekFfR/coc

Configuration file "C:\GSUtil\.boto" created. If you need to use
a proxy to access the Internet please see the instructions in that file.
Please try running gsutil again now.
-------------------------------------------------------------------

若是環境變數沒有設定正確,會有下列錯誤:
-------------------------------------------------------------------
Failure: [Errno 22] invalid mode ('w') or filename: c:\\GSUtil\\; c:\\Python27\\.boto
-------------------------------------------------------------------

若是執行指令位置,未移至 C:\GSUtil 目錄下;或是未特別指定 GSUtil 的存放路徑,會有下列錯誤:
-------------------------------------------------------------------
C:\Documents and Settings\perton>python gsutil ls
python: can't open file 'gsutil': [Errno 2] No such file or directory
------------------------------------------------------------------- 
 

指令正確執行後,因為已經建立 Configuration file "C:\GSUtil\.boto" ;若是再次執行該指令,會有下列訊息:
-------------------------------------------------------------------
C:\>python c:\GSUtil\gsutil ls
gs://family_photos/
gs://glory2god/
gs://khchurch/
gs://perton/
-------------------------------------------------------------------

PS: family_photos, glory2god, khchurch, perton 是筆者早先在 Google Storage 建立 Bucket 所定的名稱。

最好的決定就是做出決定

clip_image002    最好的決定就是做出決定

● 現實世界裡,有些事情是你無法改變的。

● 我們隨時在做決定,其中大部分都是不自覺的。

● 要是你自己不做決定,就等於是將決定權拱手讓人。

● 選擇了一個決定,就等於是排除了其他的選項。

● 當理智尚在權衡得失之際,感覺早就做了決定。

● 決定走一條嶄新的道路,有可能會導致令人痛苦難受的後果。這個時候就需要勇氣與能力!

● 知道你不想要什麼,是做抉擇的第一步。

● 沒有錯失的良機,只有沒做的決定。

● 不想在壓力下做決定,也是一種決定。

● 沒有錯誤的決定,頂多是必須忍受在前往目標的路上多繞些冤枉路。

● 倘若一個人心裡已經有個底,知道要怎麼抉擇,那麼這決定看起來會是什麼樣子?

● 你的決定不可能讓所有人都滿意,但你可以讓自己滿意。

● 只有克服了做抉擇之後的恐懼,才能做出決定。

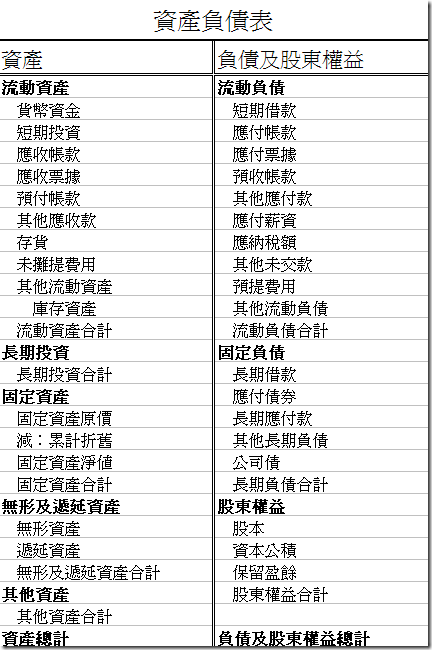
資產負債表

t1

VBA 中,該如何將文字內容寫入文字檔案?

VBA 中,該如何將文字內容寫入文字檔案?
以範例說明會比較實用:

Dim FileNumber As Integer
Dim strFile As String

FileNumber = FreeFile()
Open strPath & "\" & strFileName For Output As #FileNumber

Print #FileNumber, "<html>"
Print #FileNumber, "<head>"
Print #FileNumber, "   <meta http-equiv=""Content-Language"" content=""zh-tw"">"
Print #FileNumber, "   <meta http-equiv=""Content-Type"" content=""text/html; charset=big5"">"
Print #FileNumber, "   <title>" + frm上傳檔案資料.Form.file_namec + "</title>"
Print #FileNumber, "</head>"
Print #FileNumber, ""
Print #FileNumber, "<body>"
Print #FileNumber, "</body>"
Print #FileNumber, "</html>"

Close #FileNumber

Byte Order Mark (BOM) 須知


Bytes

Encoding Form

00 00 FE FF UTF-32, big-endian
FF FE 00 00 UTF-32, little-endian
FE FF UTF-16, big-endian
FF FE UTF-16, little-endian
EF BB BF UTF-8

Byte Order Mark [BOM]:0xFEFF
FE FF
==> High Byte FE
               Lower Byte FF

參考資源:http://www.websina.com/bugzero/kb/unicode-bom.html

產生一個不能正常開啟的 XML 檔案 (2)

在先前"產生一個不能正常開啟的 XML 檔案 (1)" 文章中提到,即使已經產生 Unicode 格式的 XML 檔案。
但是,也無法正常被開啟。
原因是檔案是 UTF-16LE,不是我們所需要的 UTF-8 格式。

要解決這問題,就需要改用 ADO Stream ,而不用 FileSystemObject 。

Write2XML_ADO Stream.vbs
-----------------------------------------------------
Dim oFile
Dim sStr

oFile = "C:\Write_ADO Stream.XML"

sStr = "<?xml version = " & Chr(34) & "1.0" & Chr(34) & " encoding = " & _
    Chr(34) & "UTF-8" & Chr(34) & " ?>" & vbCrlf
sStr = sStr & "<book>" & vbCrlf
sStr = sStr & "</book>" & vbCrlf

Set objADODBStream = CreateObject("ADODB.Stream")
objADODBStream.Charset = "UTF-8"
objADODBStream.Open
objADODBStream.WriteText sStr
objADODBStream.SaveToFile oFile, 2
objADODBStream.Close
Set objADODBStream = Nothing

WScript.Echo "C:\Write_ADO Stream.XML be Created"      

產生一個不能正常開啟的 XML 檔案 (1)

學習 VBScript 過程中,記得有一程式是要產生 XML 檔案。
程式運作後,檔案是產生了,但是卻無法正常開啟。

Write2XML.vbs
-------------------------
Const ForReading = 1, ForWriting = 2, TristateTrue = -1, TristateOff = 0
Dim oFSO,oFile,strg,re
Dim sStr

Set oFSO = CreateObject("Scripting.FileSystemObject")
Set oFile = oFSO.OpenTextFile("C:\Write.XML", ForWriting, True, TristateTrue)

sStr = "<?xml version = " & Chr(34) & "1.0" & Chr(34) & " encoding = " & _
    Chr(34) & "UTF-8" & Chr(34) & " ?>" & vbCrlf
sStr = sStr & "<book>" & vbCrlf
sStr = sStr & "</book>" & vbCrlf

oFile.WriteLine sStr

WScript.Echo "C:\Write.XML be Created"       

oFile.Close
Set oFile = Nothing

這程式使用的參數 TristateTrue 來產生 Unicode 檔案,但是此時的 Unicode 是 UTF-16 LE,而不是 UTF-8
所以,就無法以點擊滑鼠兩次的方式來開啟該 XML 檔案。

用 Batch 批次處理,實現FTP文件傳輸

在工作實務上,有時會遇到需要將很多檔案傳送到 FTP 的環境中。
但是又因為安全上的考量,又不希望使用者知道 FTP 的帳號/密碼等資料。

這時,只有用 Batch 來實作了。

方法如下:

  1. 建立 連線指令檔 ftp.txt
  2. 創建 批次檔 ftp_user.bat,並執行。


上述 ftp.txt 、ftp_user.bat 兩檔案,都是文字檔格式。
另一寫法:
       可省略 ftp.txt 中的 user (直接用 帳號ID)   
       及省略 ftp_user.bat 中的 -n 參數              

ftp.txt  (儲存在 C:\Documents and Settings\perton\DestTop\承認書 目錄中)
---------------------------
open 10.2.1.212
user perton
2127911
binary
prompt
cd Eng\BluePrint
mput "C:\Documents and Settings\perton\DestTop\承認書\085G003-A0.pdf"
bye
exit


ftp_user.bat
---------------------
ftp -n -s:"C:\Documents and Settings\perton\DestTop\承認書\ftp.txt"


參考資料:
http://forum.slime.com.tw/thread82298.html
http://hi.baidu.com/tyess/blog/item/9c4915ceabd8a43cb600c8d0.html
http://hi.baidu.com/boxroom/blog/item/c5cafd24fe9108388644f9c2.html
http://hi.baidu.com/hbliguohua/blog/item/82d790fba9f51f0ca9d31110.html
http://hi.baidu.com/vvqqq1011/blog/item/b64aea6ec4c485d281cb4acc.html
http://hi.baidu.com/ajun_li/blog/item/511a87b4c6a431de36d3cae5.html

恢復資料庫 (程式自動化)

恢復測試之前,最好先移除已存在的資料庫

Drop_DataBase_All.bat
--------------------------------------------
echo "DROP DATABASE IEDB01"
osql -S. -Usa -P1234 -Q"DROP DATABASE IEDB01"

echo "DROP DATABASE IEDB03"
osql -S. -Usa -P1234 -Q"DROP DATABASE IEDB03"


接下來的工作,就交給電腦慢慢做吧 !!
(用個 Excel 檔來設定環境,自動產生相關的批次檔案)

解壓批次檔_ALL-20110131.bat
--------------------------------------------
Title 解壓批次檔_ALL-20110131.bat

CALL 解壓批次檔_IEDB01.bat
CALL 解壓批次檔_IEDB03.bat

osql -S. -Usa -P1234 -iLocalDB_iemis_delete.sql
osql -S. -Usa -P1234 -iLocalDB_iemis_owner.sql
osql -S. -Usa -P1234 -iLocal_tempdb_iemis_owner.sql
' (這是修正資料庫擁有者權限的必要指令)


解壓批次檔_IEDB01.bat
--------------------------------------------
echo "==== DB恢復及刪除解壓檔案 ===="
osql -S. -Usa -P1234 -iRestore_IEDB01.sql

Restore_IEDB01.sql
--------------------------------------------
RESTORE DATABASE IEDB01 FROM DISK = 'E:\A-Zip\IEDB01_20110131\IEDB01-2011-01-31.bak'
Go

LocalDB_iemis_delete.sql
--------------------------------------------
delete IEDB01..sysusers
where name='iemis'
Go

.
.
.

LocalDB_iemis_owner.sql
--------------------------------------------
print 'IEDB01'
use IEDB01
Go
sp_adduser   @loginame ='iemis' , @name_in_db = 'iemis'
Go
sp_addrolemember @rolename = 'db_owner' , @membername = 'iemis'
Go

.
.
.

Local_tempdb_iemis_owner.sql
--------------------------------------------
use tempdb
GO
sp_adduser   @loginame ='iemis' , @name_in_db = 'iemis'
GO
sp_addrolemember @rolename = 'db_owner' , @membername = 'iemis'
GO

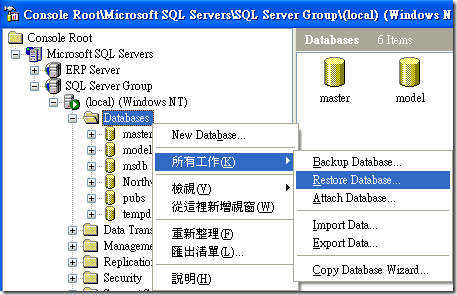
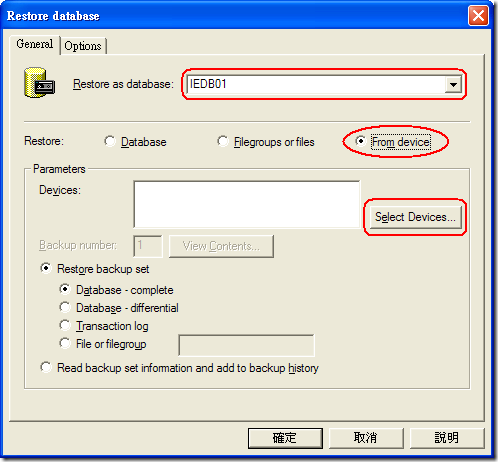
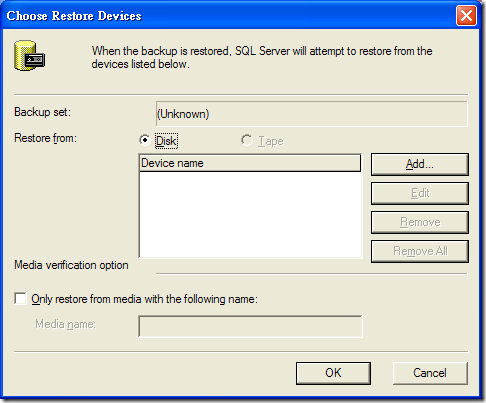
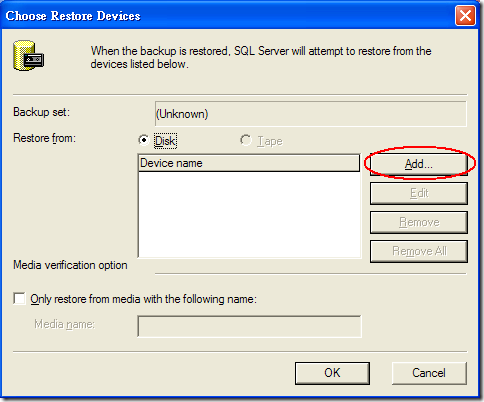
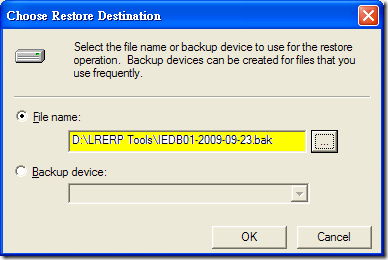
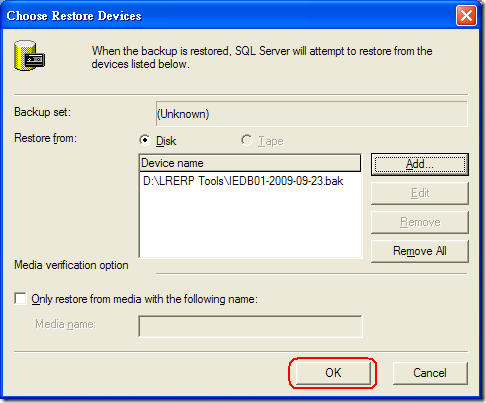
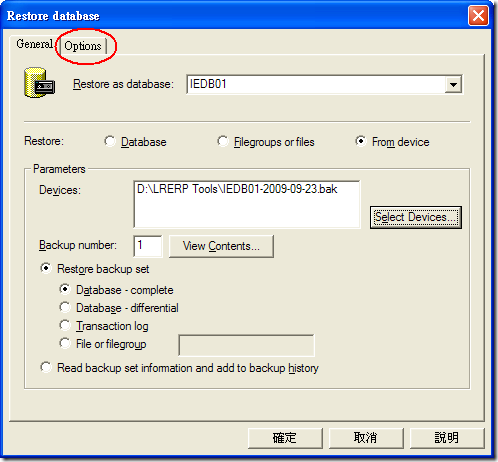
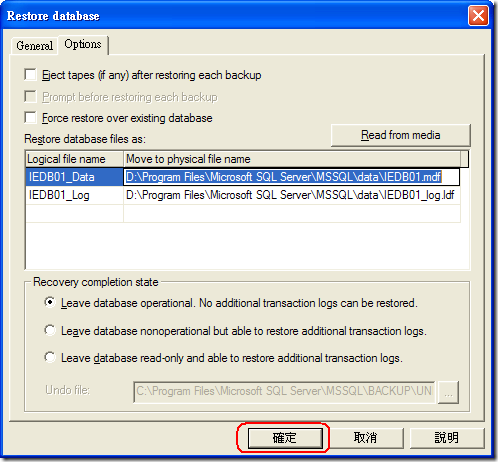
恢復資料庫 (手動執行)

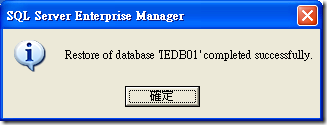
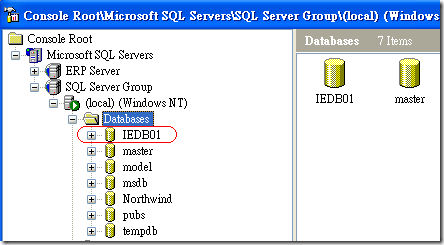
Databases01

Databases02

Databases03

Databases04

Databases05

Databases06

Databases07

Databases08

 Databases09


 Databases11

Restore01

Restore02

Restore04

 Restore05  

 Databases20

Databases21       

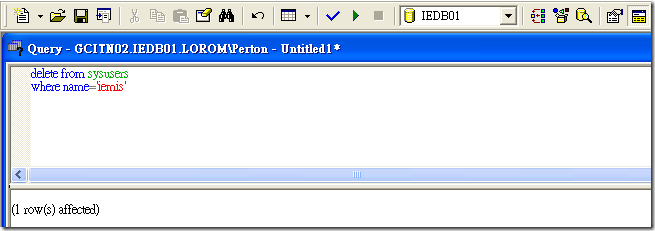
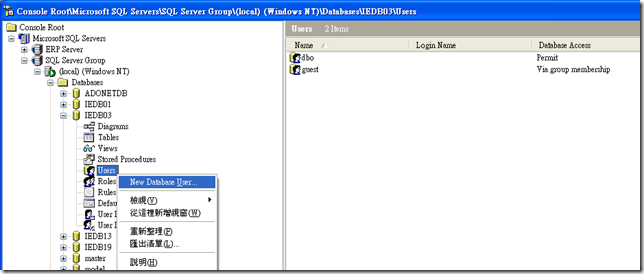
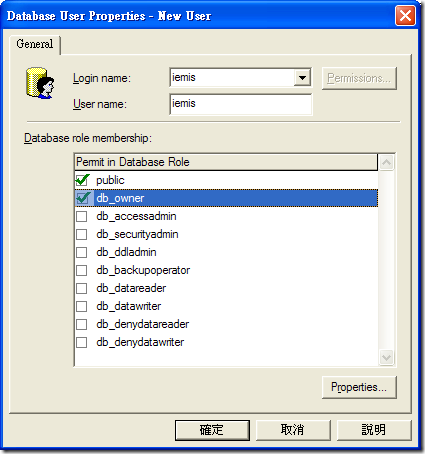
(原先儲存在資料庫的帳號資料,要先刪除,再重新設定,才能正常使用恢復後的資料庫)

image

NoUser_iemis-01

 NoUser_iemis-02

Cannot resolve collation conflict for equal to operation

執行 SQL 指令時,發生錯誤訊息:
Cannot resolve collation conflict for equal to operation

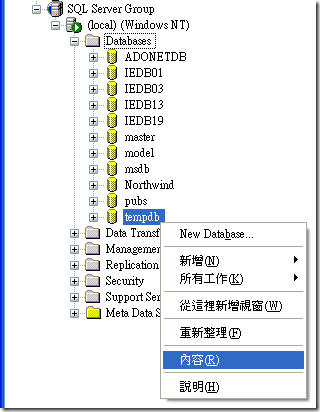
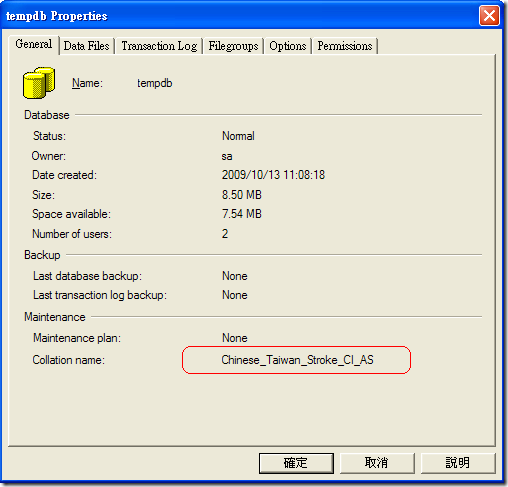
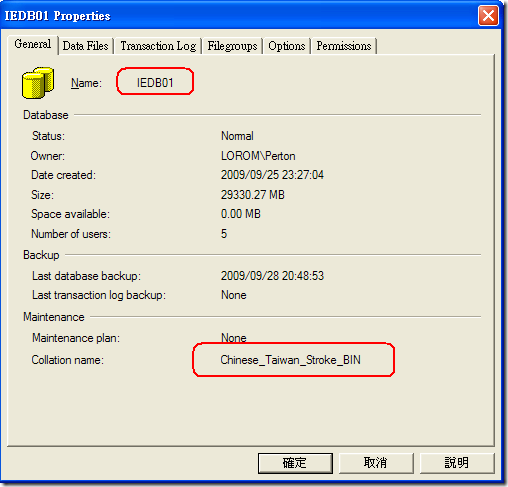
造成這類型的錯誤,是因為資料庫的連線編碼(collation)設定不一致。
可參考下列圖示,來加以修正。

Collation-04

Collation-01

Collation-02

 Collation-03

Upload File vs PHP (多檔上傳)

PHP 上傳檔案的必要環境:

php.ini 之設定  [C:\AppServ\php5]

  1. 確認允許檔案上傳
    file_uploads = On
  2. 設定暫存目錄區的路徑
    upload_tmp_dir = "C:/temp"
  3. 設定可接受的上傳檔案大小
    upload_max_filesize = 10M

Apache 設定檔 httpd.conf  [C:\AppServ\Apache2.2\conf]

  1. 設定主機傳送及接收的等待時間(秒)
    Timeout 300

檔案上傳的表單 (Form),使用之注意事項:

  1. 以 POST 方式傳送資料
  2. <form> 標籤要加入
    enctype="multipart/form-data" 屬性
  3. 傳送資料的 <input> 標籤,必須設定 type="file" 屬性,以產生 瀏覽 按鈕。
  4. 建議設定一隱藏欄位:name="MAX_FILE_SIZE" ,value 必須設定一數字,做為上傳檔案大小的限制。
    單位:bytes
  5. 將表單中 type="file" 的 <input> 標簽名稱 name,改由陣列方式來處理

程式範例:

upload.htm
-------------------------------------------------------
<html> 
<head>
   <meta http-equiv="Content-Type" content="text/html; charset=utf-8">
   <title>檔案上載</title>
</head>

<body>
   <form action="upload.php" method="post" enctype="multipart/form-data">
      <input type="hidden" name="MAX_FILE_SIZE" value="10000000">                                                
      選擇檔案一:<input name="uploadfile[]" type="file"> 
      選擇檔案二:<input name="uploadfile[]" type="file"> 
      選擇檔案三:<input name="uploadfile[]" type="file"> 
      <input type="submit" value="送出">
   </form>
</body>
</html>


upload.php
-------------------------------------------------------
<html>
<head>
   <meta http-equiv="Content-Type" content="text/html; charset=utf-8">
   <title>多個檔案上傳處理</title>
</head>

<body>
   <?
   $uploaddir="./upload/"; 
   $i=count($_FILES["fileupload"]["name"]);
   for ($j=0 ; $j<$i ; $j++)
   {
      $tmpfile=$_FILES["uploadfile"]["tmp_name"][$j];
      $file2=mb_convert_encoding($_FILES["uploadfile"]["name"][$j],"big5","utf8");
      if(move_uploaded_file($tmpfile,$uploaddir.$file2))
     {
         echo "上傳成功<br>";
         echo "檔案名稱:".$_FILES["uploadfile"]["name"][$j]."<br>";
         echo "檔案類型:".$_FILES["uploadfile"]["type"][$j]."<br>";
         echo "檔案大小:".$_FILES["uploadfile"]["size"][$j]."<br>";
      }
     else
      {
         echo "上傳失敗!<br> ";
         echo "檔案名稱:".$_FILES["uploadfile"]["name"][$j]."<br>";
         echo "檔案類型:".$_FILES["uploadfile"]["type"][$j]."<br>";
         echo "檔案大小:".$_FILES["uploadfile"]["size"][$j]."<br>";
         echo "失敗原因:".$_FILES['uploadfile']['error'][$j]."<br>";
      }
   }
   ?>
</body>
</html>

Upload File vs PHP (單檔上傳)

PHP 上傳檔案的必要環境:

php.ini 之設定  [C:\AppServ\php5]

  1. 確認允許檔案上傳
    file_uploads = On
  2. 設定暫存目錄區的路徑
    upload_tmp_dir = "C:/temp"
  3. 設定可接受的上傳檔案大小
    upload_max_filesize = 10M

Apache 設定檔 httpd.conf  [C:\AppServ\Apache2.2\conf]

  1. 設定主機傳送及接收的等待時間(秒)
    Timeout 300

檔案上傳的表單 (Form),使用之注意事項:

  1. 以 POST 方式傳送資料
  2. <form> 標籤要加入
    enctype="multipart/form-data" 屬性
  3. 傳送資料的 <input> 標籤,必須設定 type="file" 屬性,以產生 瀏覽 按鈕。
  4. 建議設定一隱藏欄位:name="MAX_FILE_SIZE" ,value 必須設定一數字,做為上傳檔案大小的限制。
    單位:bytes

程式範例:

upload.htm
-------------------------------------------------------
<html>
<head>
   <meta http-equiv="Content-Type" content="text/html; charset=utf-8">
   <title>檔案上載</title>
</head>

<body>
   <form action="upload.php" method="post" enctype="multipart/form-data">
      <input type="hidden" name="MAX_FILE_SIZE" value="10000000">                                                
      選擇檔案:<input name="uploadfile" type="file">
      <input type="submit" value="送出">
   </form>
</body>
</html>


upload.php
-------------------------------------------------------
<html>
<head>
   <meta http-equiv="Content-Type" content="text/html; charset=utf-8">
   <title>檔案上傳處理</title>
</head>

<body>
   <?
   $uploaddir="./upload/";
   $tmpfile=$_FILES["uploadfile"]["tmp_name"];
   $file2=mb_convert_encoding($_FILES["uploadfile"]["name"],"big5","utf8");
   if(move_uploaded_file($tmpfile,$uploaddir.$file2))
   {
      echo "上傳成功<br>";
      echo "檔案名稱:".$_FILES["uploadfile"]["name"]."<br>";
      echo "檔案類型:".$_FILES["uploadfile"]["type"]."<br>";
      echo "檔案大小:".$_FILES["uploadfile"]["size"]."<br>";
   }
   else
   {
      echo "上傳失敗!<br> ";
      echo "檔案名稱:".$_FILES["uploadfile"]["name"]."<br>";
      echo "檔案類型:".$_FILES["uploadfile"]["type"]."<br>";
      echo "檔案大小:".$_FILES["uploadfile"]["size"]."<br>";
      echo "失敗原因:".$_FILES['uploadfile']['error']."<br>";
   }
   ?>
</body>
</html>

忘記 root帳號的密碼情況下,該如何處理? (Windows)

  1. 啟動 DOS Command Line
  2. 關閉 MySQL Service
    mysql_servicestop.bat 
    OR net stop mysql
  3. 啟動忽略權限資料表的 MySQL Service
    start /b C:\AppServ\MySQL\bin\mysqld-nt.exe --skip-grant-tables --user=root
  4. 變更 MySQL 資料庫 root 密碼
    C:\AppServ\MySQL\bin\mysql -e "update mysql.user set password=password('新密碼') where user='root'; "
  5. 完全關閉 MySQL Server
    C:\AppServ\MySQL\bin\mysqladmin -u root shutdown
  6. 重啟 MySQL Service,並測試是否登入正常?
    mysql_servicestart.bat 
    OR net start mysql
     
    mysql –uroot -p新密碼


忘記 root帳號的密碼情況下,該如何處理? (Linux)

  1. 關閉 MySQL Service
    service mysqld stop    (Linux)
  2. 啟動忽略權限資料表的 MySQL Service
    mysqld_safe –skip-grant-tables&
  3. 登入 MySQL 資料庫
    mysql
    因步驟 2已忽略權限資料表的服務,所以沒有輸入帳號、密碼,就可以登入。
    此時的 MySQL 是不對外提供連線服務。
  4. 選擇資料庫,並且變更 root 密碼
    user mysql;
    update user set password=password('新密碼') where user='root';
  5. 刪除空帳號
    delete from user where user='';
  6. 確認更新後,登出
    flush privileges;
    exit
  7. 清除 MySQL 運行中的程序
    ps -aux|grep  'mysql'     (Linux)
    kill 
    pid (上述指令查詢結果的第二個欄位值)
  8. 重啟 MySQL Service,並測試是否登入正常?
    service mysqld start    (Linux)
    mysql –uroot -p新密碼


OLE DB Connect String (Access 2007)

連線到資料庫的 OLE DB 用法,一般來說,可以使用:
1. *.udl 連線字串記錄檔
2. 程式中直接用連線字串

以下是各類型資料庫連線字串的範例:

  1. MySQL
    Provider=OleMySql.MySqlSource.1;Persist Security Info=False;User ID=root;Data Source=localhost;Activation="";Mode=Read;Trace="";Initial Catalog=db;Command Time Out=600
  2. SQL Server
    Provider=SQLOLEDB.1;Password=_pw_;Persist Security Info=True;User ID=_id_;Initial Catalog=_db name_;
    Data Source=_ip_ or . or _電腦名稱_ or (local)
  3. Access 97
    Provider=Microsoft.Jet.OLEDB.3.51;
    Persist Security Info=False;
    Data Source=C:\mdb\books.mdb
  4. Access 2000 (有設定密碼)
    Provider=Microsoft.Jet.OLEDB.4.0;
    Persist Security Info=False;
    Data Source=C:\mdb\books.mdb;
    Jet OLEDB:Database Password=_pw_
  5. Access 2007 (有設定密碼)
    Provider=Microsoft.ACE.OLEDB.12.0;
    Persist Security Info=False;
    Data Source=MyDatabaseName.accdb;
    Jet OLEDB:Database Password=_pw_


附註:
   Access 2007 database (.accdb ext)
   Excel 2007 workbook (.xlsm ext)
   ACE (Access Connectivity Engine)